
Alright folks, this is going to be a long one, but bear with me. If you're looking for an amazing, unique, and thoughtful homemade Christmas gift idea, you'll want to read this. Every year for the past several years, two of my coworkers have gotten together to make homemade Christmas gifts for friends and family. Their past endeavors have included vanilla extract from scratch, wine bottle lamps, and beaded bracelets. This year, I joined in on the fun (really though, I invited myself along). We threw around several ideas before Marcy came across homemade lip balm!
A quick Google search yielded over 2.5 MILLION recipe results. How's a girl to choose? We reviewed a bunch of the recipes and eventually landed on this one from Body Unburdened. There are only FOUR ingredients, so you aren't putting any mystery ingredients on your lips. Count them:
- Beeswax
- Shea Butter
- Coconut Oil
- Essential Oil of your choice
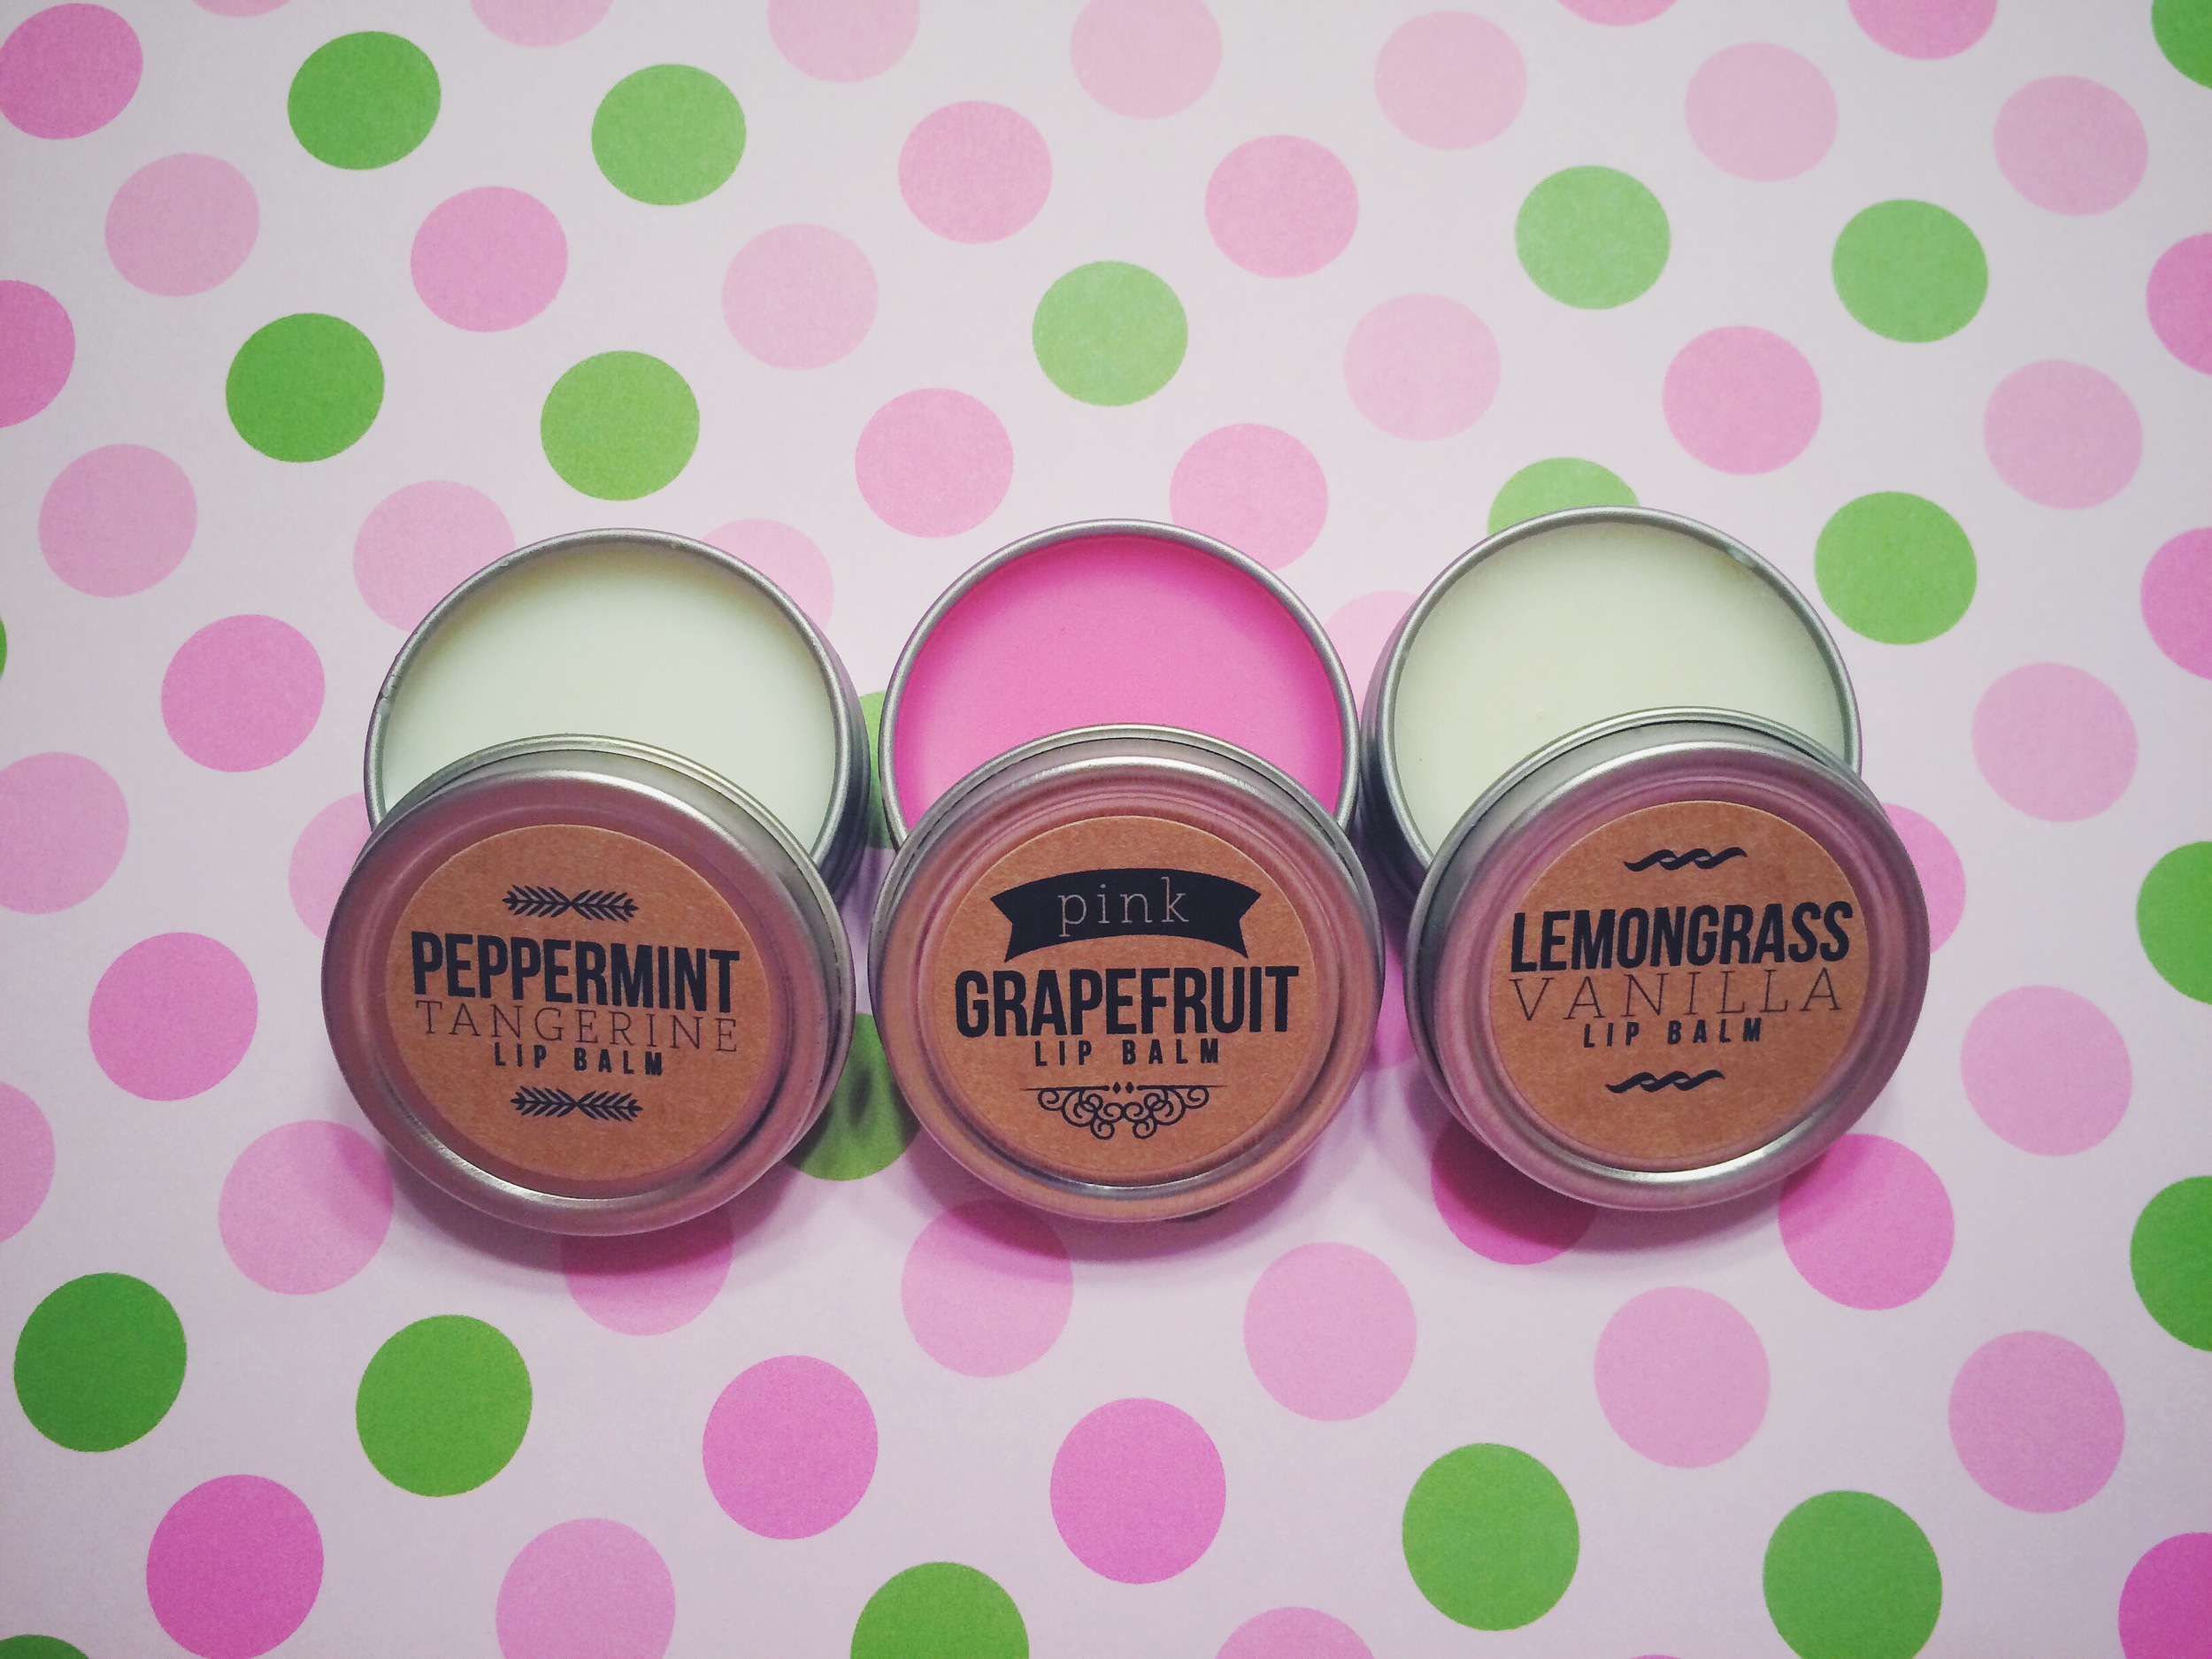
Now on to the next challenge, what flavors would we make!? There are SO many essential oils to choose from. Our chosen recipe noted Peppermint Tangerine as an awesome combo. We also decided to make Pink Grapefruit and Lemongrass Vanilla.
Since we had three people with lots of gifts to give and wanted to end up with about 225 balms, we had to do some number crunching. My head was spinning - teaspoons in a tin, drops in a mL, mL in a tsp, tsp in a cup. I of course made an Excel spreadsheet to figure it all out. If you know me, this will not surprise you.
We figured that the 1/2 oz tins we chose should hold about 1 Tbsp of balm, and that the base recipe should make about 2 tins. So we were working in multiples of 30 and 40 for each of our flavors. You may want to start with a much smaller batch, so you can scale the base recipe accordingly.
Base Recipe:
- 2 tsp beeswax
- 1 tsp shea butter
- 1 Tbsp coconut oil
- 1 mL (20 drops) essential oil
To figure out your multiple, take your desired number of balms divided by 2.
(i.e. I want 40 lip balms. 40 / 2 = 20. I need to multiply the base recipe by 20)
Essential oils typically come in either 10mL or 30mL bottles. For the recipe below, I scaled up the base recipe to use a full 10mL bottle of essential oils (basically multiplying the recipe by 10 - which should give you about 20 tins if you use the same tins we did). Each lip balm ended up costing about $1.08 which included all of our supplies (with some left over). If you factor in the extra materials and the fact that we had no idea what we were doing, you can probably plan to spend less than $1.00 per balm.
If you're going to make this at home, get ready for things to get slippery, and make sure you check out my "Lessons Learned" section below before you get started shopping/making. It's a great project to tackle with friends, so get together, pour some wine, eat some soup, and find yourself a mascot like Owen. A big thank you to Debbie for being our gracious host, and her husband Steve for cleaning up our mess!


HOMEMADE LIP BALM
This recipe should make ~20 lip balm tins (using 1/2 oz tins)
SUPPLIES:
We ordered all of the supplies in bulk, so we were able to save some money. Here's where we found each item:
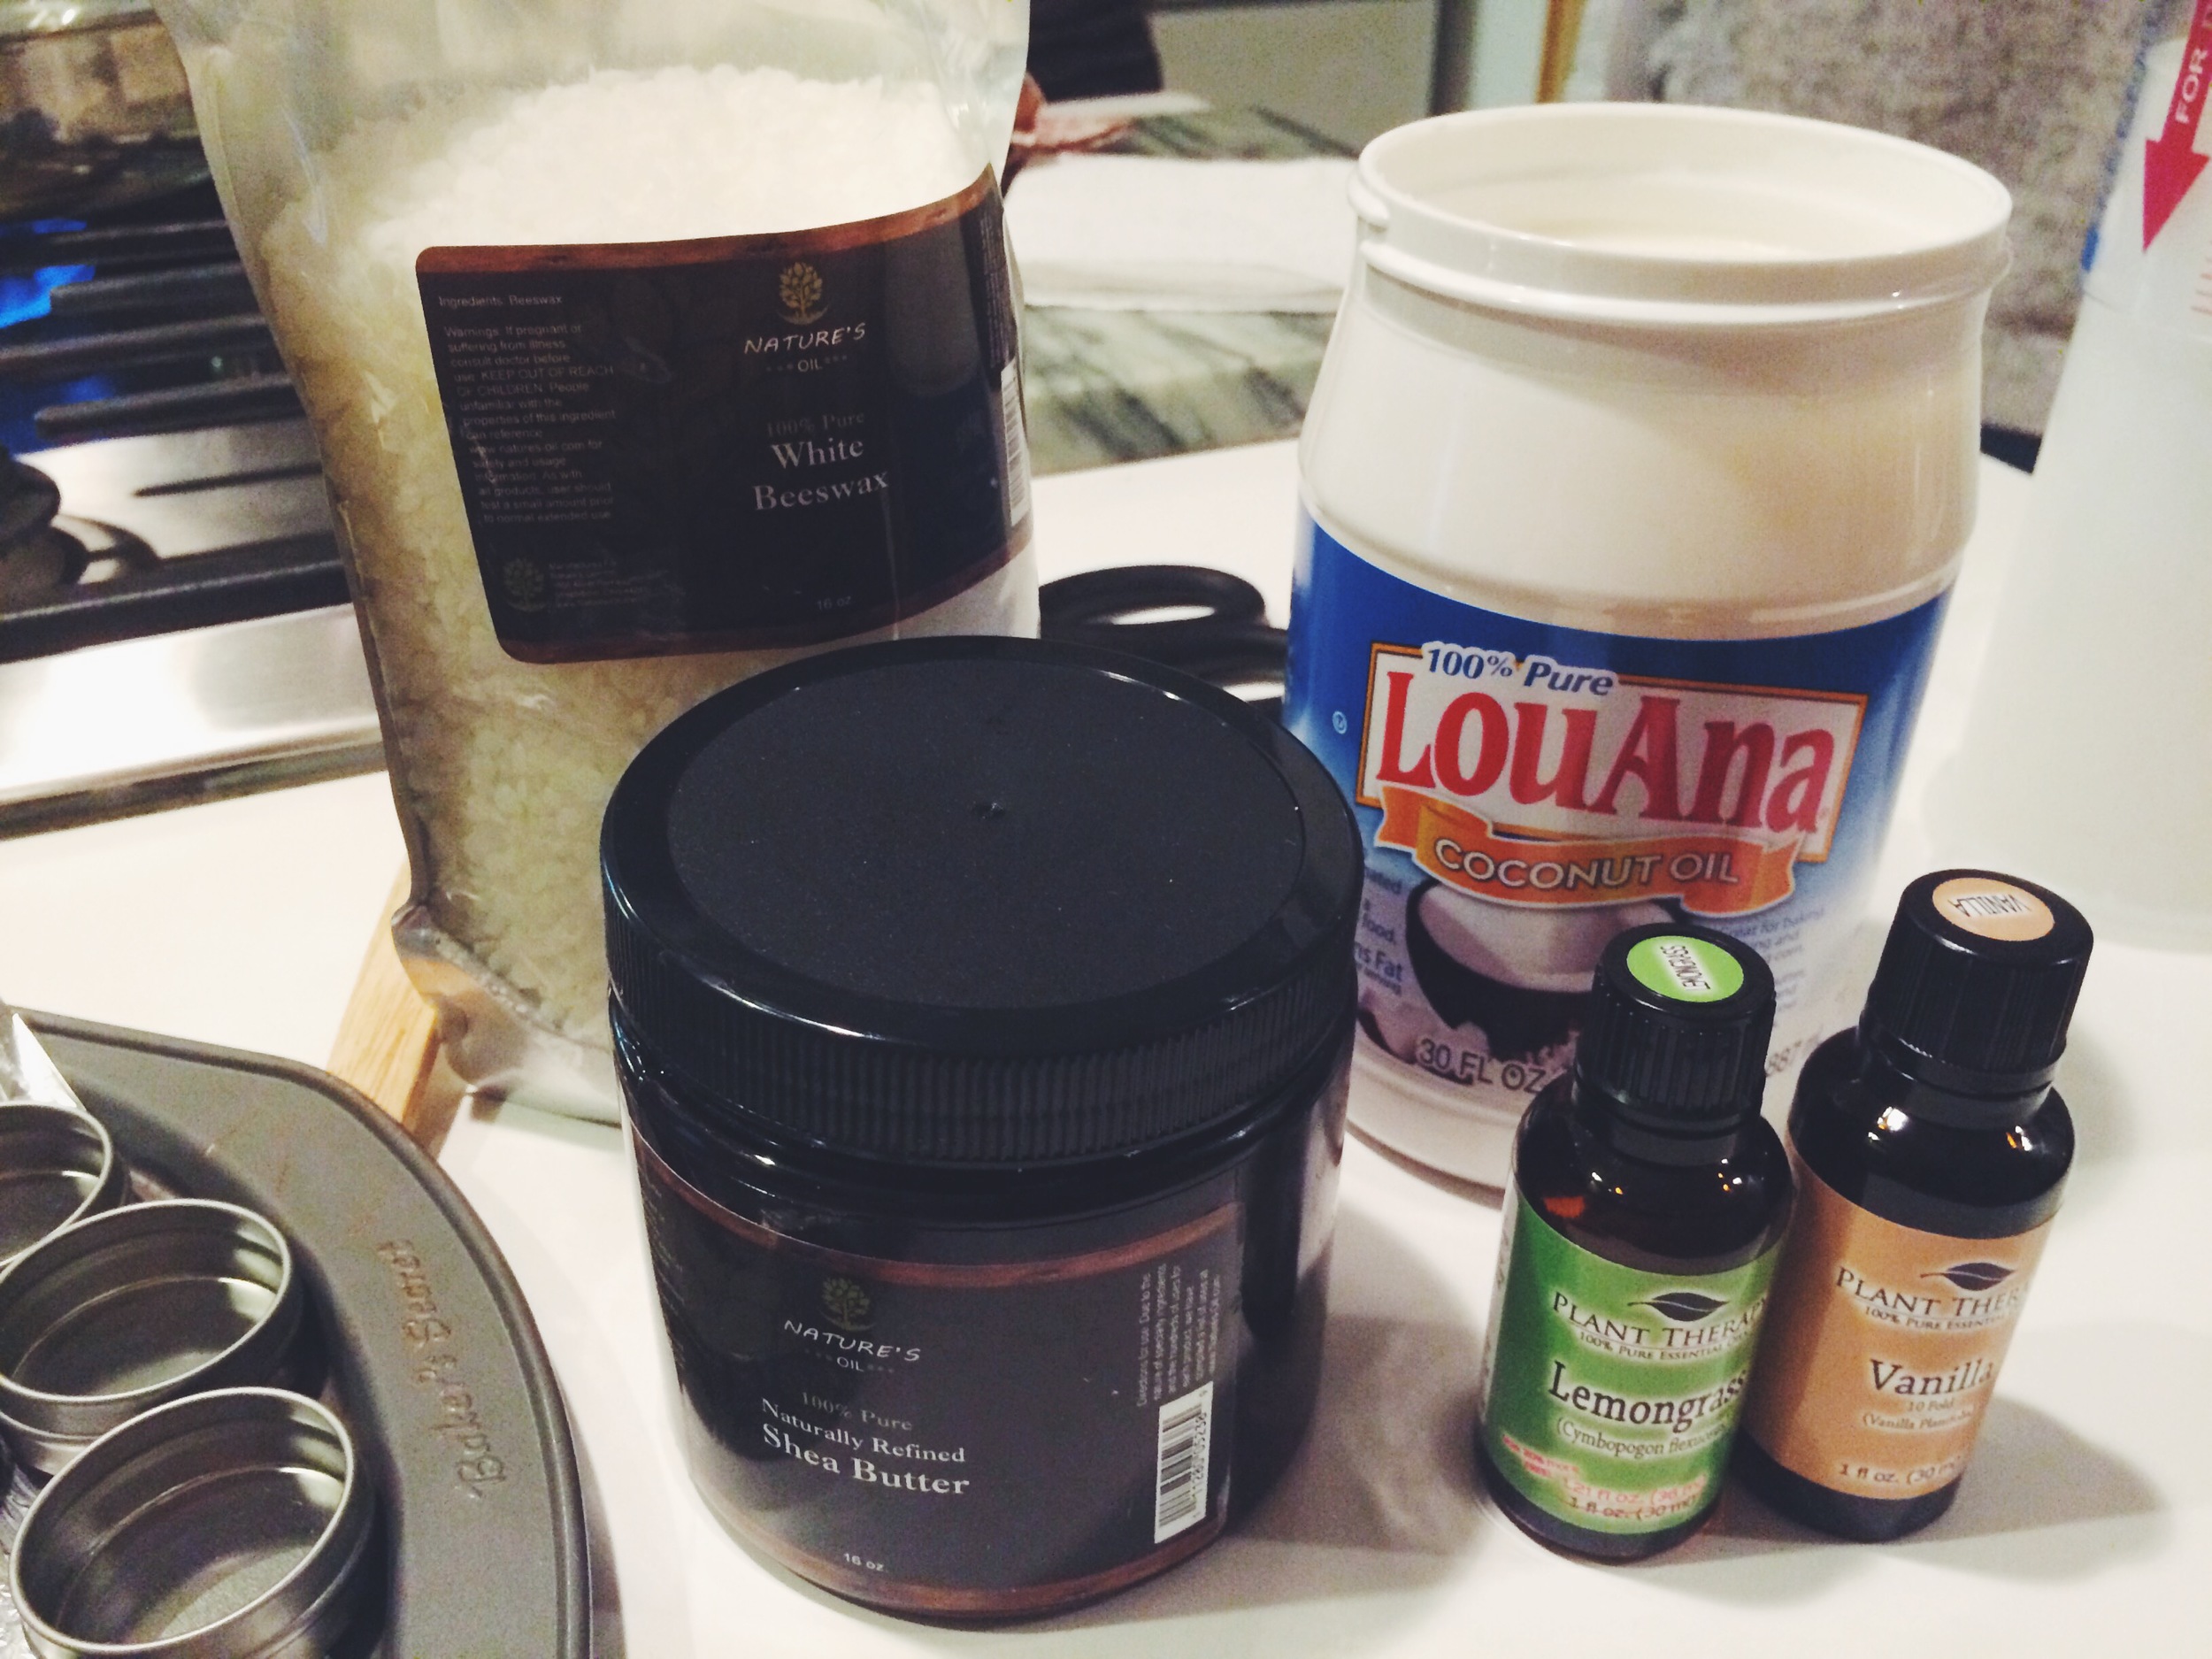
- White Beeswax - Nature's Oil
- Shea Butter - Nature's Oil
- Coconut Oil - bought from Wal Mart, but you could order this online
- Essential Oils - ordered Plant Therapy brand from Amazon.com, all with free shipping
- 1/2 oz Metal Tins - SKS Bottle & Packaging
- Disposable droppers - ordered from Amazon OR Syringes like this - bought from Wal Mart (see my note below on the pros/cons of each)
- Brown Paper Labels - Bulk Apothecary (they come blank and you can print whatever you want on them)
You'll also need some other supplies that you may already have on hand:
- Pan + Glass Bowl (or glass measuring cup) to create a "double boiler"
- Spoons for stirring
- Cookie sheets (cover with aluminum foil to make clean-up easy)
- Slice of red lipstick (if you'd like to add some color), note that it looks darker when melted than it will when it sets.
RECIPE: (base recipe multiplied by 10)
- 1/3 cup + 1 Tbsp + 1 tsp beeswax
- 3 Tbsp + 1 tsp shea butter
- 1/2 cup + 2 Tbsp coconut oil
- 10 mL essential oil of your choice (if you want to mix two flavors, use 5mL or 1 tsp of each)
INSTRUCTIONS:
First, cover your cookie sheets with aluminum foil, uncap all of your tins, and lay them out on the cookie sheets.
Fill your pan with enough water so that when a glass bowl is set on top, the water touches the bottom of the bowl. Bring the water to a slow boil and place your bowl on top. Be very careful not to burn yourself - that steam gets hot!


Add the beeswax and give it a bit of a head start as it takes the longest time to melt. In the meantime, measure out your shea butter and coconut oil. This recipe is pretty forgiving, so if you end up with a little more or less of one of the ingredients, it shouldn't matter. A measuring cup like this works great for these two ingredients.
Once the beeswax has started to melt, add in the shea butter and coconut oil. If you're tinting with lipstick, add it at this step. Stir until the mixture is completely melted. Remove the pan from heat and place it on a hot pad near your tins, then stir in the essential oil.


Next, get ready to fill! Using either your disposable droppers or syringes, transfer the melted mixture into the tins, filling each as close to the top as you can get.


Allow them to set, put the lids/labels on, and you're done! Package them up for gift giving, enjoy your velvety smooth, delicious smelling lips, and give someone a big smooch.

LESSONS LEARNED:
- Use this as a quick conversion guide when scaling the base recipe:
- 1/2 oz = 1 Tbsp = 3 tsp
- 5mL = 1 tsp, 10 mL = 2 tsp
- 1lb beeswax = ~4 cups
- 1 cup = 16 Tbsp = 48 tsp
- Though it smelled lovely, I would not recommend using Vanilla essential oil, as it is brown in color and did not fully dissolve into the mixture. You'll see in this photo that it left ugly brown dots in our balm. The dots sank to the bottom so our Vanilla Lemongrass ones still look fine, but the Vanilla oil settled down in the tin and is still liquid. Unless you can find a clear version, don't use Vanilla.
- Droppers vs Syringe
- If you use the disposable droppers I noted above, you'll only spend $6 for 25 pipettes, but you'll probably need at least two transfers to fill each tin. Also, the wax can start to harden in the end and you may have to work it a bit to get it to fill.
- At first, we started using syringes like the ones noted under "Supplies" to fill the tins. They worked great and you could fill a whole tin with one go, but after a while they started to melt and the plunger was almost impossible to pull back. If you go this route, make sure you have extras! You may get away with this method if you are doing a small batch and let the balm mixture cool a bit before filling. These cost about $2.50 each at Wal Mart.
- For our Pink Grapefruit balms which we dyed pink, we added a whole tube of red lipstick into a big batch (base recipe x 30 - pink grapefruit). This isn't really enough color to affect your lips, it just tints the balm.
- Do not be tempted to color the lip balm with food coloring. We tested a small amount in an attempt to give the Peppermint Tangerine flavor a hint of orange color, but the gel food dye would not mix in.
- Several tutorials I found online said to fill a pan partially with water, place a canning ring in the bottom, and sit your glass melting container on top. This may work for small quantities but since we were making such large batches, we found a standard double boiler set up to work best for us.
- If you spill as you go, wait until the balm sets to wipe up the tins. It's much less messy that way.
- If you under-fill and decide to go back to top them off, make sure you cover the entire top to get a nice smooth finish.
- If your balm mixture starts to harden in your dropper, you may need to reheat the balm. Just pop the pan back on the stove to get it nice and melty again.
- I designed labels for each flavor we made, and Debbie designed cute "XOXO" tags so we could group a few together for gift-giving.
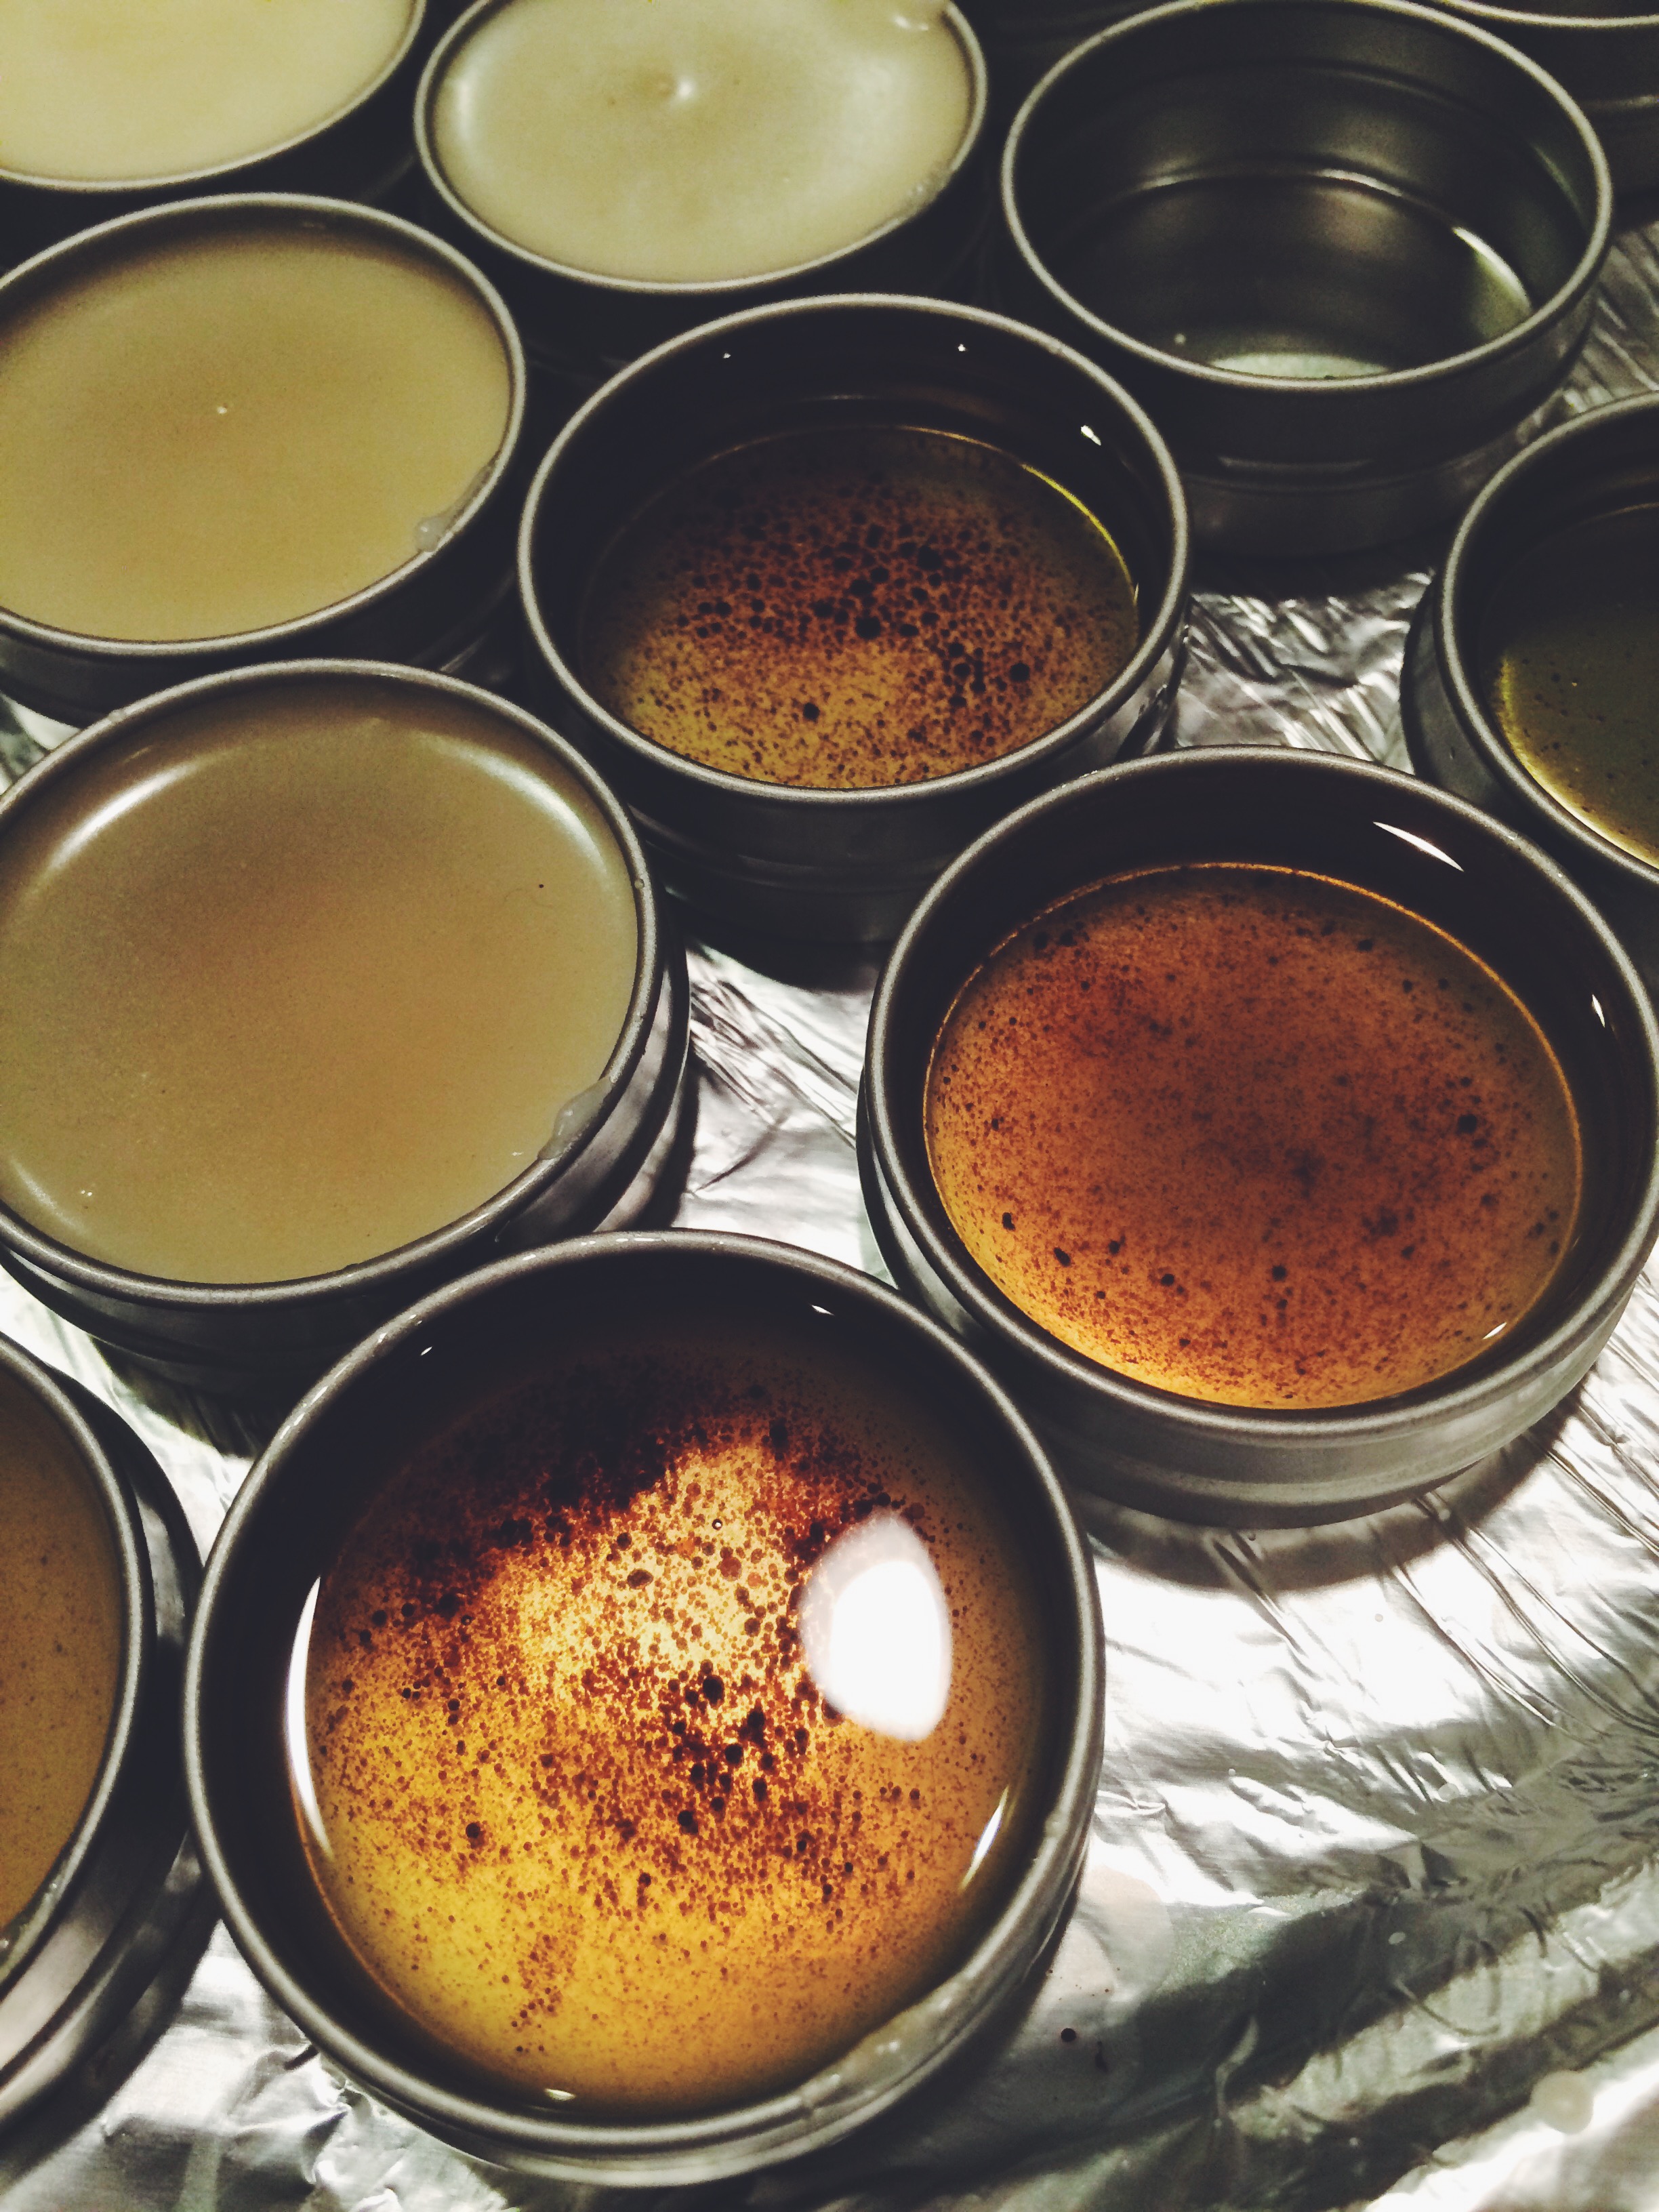
Vanilla essential oil - not cool.

When topping the tins off, be sure to end with one smooth layer.

We printed these designs on brown paper labels.

I'll punch a hole in the corner and use these as gift tags!